My sweet girl turned 6 this year!!! I still can't believe I have a 6 year old!!! I really wanted to give her a special birthday party this year. I never have done a birthday party quite as BIG as this for my girl. This was defiantly a lot of HARD work. This wouldn't have been possible without all of my MOM's help. So THANKFUL for all that she did to make this happen!!!
To give you an idea on how long it took to put this party together, my mom and I started working on this party in the SPRING time and the party was in November. WOAH!! Right?!? It was defiantly worth all of the hard work. It turned out so great!! I just won't be doing something like this every year. You all understand. Right? :)
For the invitation we wanted to make something special that we could deliver to each girls door so we came up with paper purses for the invitations.
The Invitation: Barbie paper purse: You can find a template for a purse on google.
We also made Bubble gum necklaces and a flower hair clips for the girls.
Emma took a bite out of one of her bubblegum before I got a chance to take her picture. Bummer!! But it still looks cute.
The party started off with the girls designing their own Barbie dresses!
One of my favorite things was letting the girls design their own Barbie dress for their Barbie dolls. They LOVED IT!!! All you need is some stick on gems and flowers and your good to go. My AMAZING mom made these beautiful barbie dresses, She spent so much time on them. She is so AMAZINGLY TALENTED!!!
They were so proud of their Barbie Dresses!!

I found my frames at Ikea for $5!!
After the girls designed their barbie dresses they went shopping for candy and jewelry
The Barbie Jewelry Boutique: Another fun part about this party was the girls all went shopping at Barbie's Boutique.
They loved it and they looked so cute all DOLLED UP!!
Necklaces!! We found all of our necklaces at Claires. We always made sure to pick some up when they were having a big sale. Making the necklaces a $1 each.
Don't you love the Jeweled up compact mirrors?!? I LOVE them!!!
Lollipop lip gloss!!
After shopping for Jewelry the girls went shopping at Barbie's Candy Shop!! They were in HEAVEN!!! Yummy pink candy, cute and tasty!!
Cute!!
Decorations
One of my favorite decorations that I made for my sweet girls party is this Barbie picture. I found it at a used store, called the DI. Can you believe this use to be a junky old mirror?? My plan was to keep it as a mirror, but it cracked!! I was so sad. Lucky for me It sure turned out great as a picture!! :)
My mom and I spray painted it watermelon pink and covered the backing of the mirror with batting and fabric and glue gunned it down. Then we took some black fabric and traced a Barbie doll image onto it and hot ironed it on to the fabric. We added some pearls around the border of the frame and her neck and ear for a little EXTRA cuteness!!
The Decorations!!
Found this at a party store.
Used a cricket to make the Birthday Banner!!
Covered the walls with black and white poka dot wrapping paper. You can find it at Hobby Lobby.
My mom found vintage barbie images on the web to customize them into cute vintage barbie soda's.
SO PRETTY!! They look even better in person.
I love HOBBY LOBBY!! I Found a lot of stuff for the party at Hobby Lobby!
This BEAUTIFUL BARBIE CAKE was made by a friend of mine Heidi Roark. She is going to culinary school. She has a blog called
Rcakes. She makes such cute cakes. All of the girls were in love with Emma's cake.
Heidi also made the Cupcakes!!
All of the girls were lucky enough to take home their very own Barbie!!
All of the girls also took home a Boa!! The dress hanger was bought at Hobby Lobby.
Here is a few of them all dolled up!!
So cute!! RIGHT?!?
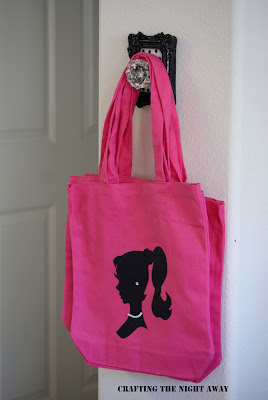
Customized Barbie Bags: The girls used these to go shopping for their candy and jewelry.
All you need is a pink tote bag, pearl beads and black fabric. Print out a barbie silhouette from the computer and trace it onto black fabric. Then heat transfer it onto your tote bags. So easy and it looks so FABULOUS!!!
Don't you love the pink tulle on the chairs?!?!! So stinking cute!!
Barbie plates and water.
Gotta love friends. So cute!!
These balloons were held down by Barbie! Thanks Barbie :)
Love this!! You can find it at Hobby Lobby!!!
Here they are ALL DOLLED UP!!! L-O-V-E
Barbie box for a photo-op with the girls.
My mom made this for the girls to take their picture in it,
The Birthday Girl!!
Silly girl!!
Such a fun party!!! I'm hoping my sweet girl never forgets her special 6th Birthday party. I know I never will. I found all of my inspiration at these places.


.png)


