Thursday, December 6, 2012

Barbie Party


My sweet girl turned 6 this year!!! I still can't believe I have a 6 year old!!! I really wanted to give her a special birthday party this year. I never have done a birthday party quite as BIG as this for my girl. This was defiantly a lot of HARD work. This wouldn't have been possible without all of my MOM's help. So THANKFUL for all that she did to make this happen!!!

 To give you an idea on how long it took to put this party together, my mom and I started working on this party in the SPRING time and the party was in November. WOAH!! Right?!? It was defiantly worth all of the hard work. It turned out so great!! I just won't be doing something like this every year. You all understand. Right? :) 


For the invitation we wanted to make something special that we could deliver to each girls door so we came up with paper purses for the invitations. 

The Invitation: Barbie paper purse: You can find a template for a purse on google.


We also made Bubble gum necklaces and a flower hair clips for the girls.

Emma took a bite out of one of her bubblegum before I got a chance to take her picture. Bummer!! But it still looks cute. 


The party started off with the girls designing their own Barbie dresses! 

One of my favorite things was letting the girls design their own Barbie dress for their Barbie dolls. They LOVED IT!!! All you need is some stick on gems and flowers and your good to go. My AMAZING mom made these beautiful barbie dresses, She spent so much time on them. She is so AMAZINGLY TALENTED!!!


They were so proud of their Barbie Dresses!!


I found my frames at Ikea for $5!!


After the girls designed their barbie dresses they went shopping for candy and jewelry

The Barbie Jewelry Boutique: Another  fun part about this party was the girls all went shopping at Barbie's Boutique. 

 They loved it and they looked so cute all DOLLED UP!!


Necklaces!! We found all of our necklaces at Claires. We always made sure to pick some up when they were having a big sale. Making the necklaces a $1 each.

Don't you love the Jeweled up compact mirrors?!? I LOVE them!!! 

Lollipop lip gloss!!


After shopping for Jewelry the girls went shopping at Barbie's Candy Shop!! They were in HEAVEN!!! Yummy pink candy, cute and tasty!!


Cute!!


Decorations

One of my favorite decorations that I made for my sweet girls party is this Barbie picture. I found it at a used store, called the DI. Can you believe this use to be a junky old mirror?? My plan was to keep it as a mirror, but it cracked!! I was so sad. Lucky for me It sure turned out great as a picture!! :) 

 My mom and I spray painted it watermelon pink and covered the backing of the mirror with batting and fabric and glue gunned it down. Then we took some black fabric and traced a Barbie doll image onto it and hot ironed it on to the fabric. We added some pearls around the border of the frame and her neck and ear for a little EXTRA cuteness!!


The Decorations!!


Found this at a party store.


Used a cricket to make the Birthday Banner!!


Covered the walls with black and white poka dot wrapping paper. You can find it at Hobby Lobby.

My mom found vintage barbie images on the web to customize them into cute vintage barbie soda's.

 SO PRETTY!! They look even better in person.

I love HOBBY LOBBY!! I Found a lot of stuff for the party at Hobby Lobby!


This BEAUTIFUL BARBIE CAKE was made by a friend of mine Heidi Roark.  She is going to culinary school. She has a blog called Rcakes. She makes such cute cakes. All of the girls were in love with Emma's cake. 


Heidi also made the Cupcakes!!


All of the girls were lucky enough to take home their very own Barbie!!


All of the girls also took home a Boa!! The dress hanger was bought at Hobby Lobby.


Here is a few of them all dolled up!!


So cute!! RIGHT?!?


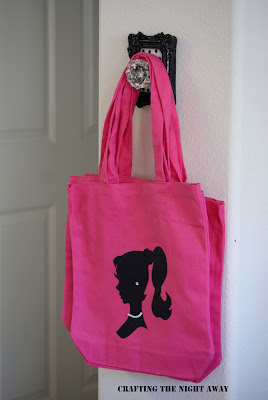
Customized Barbie Bags: The girls used these to go shopping for their candy and jewelry.  

All you need is a pink tote bag, pearl beads and black fabric. Print out a barbie silhouette from the computer and trace it onto black fabric. Then heat transfer it onto your tote bags. So easy and it looks so FABULOUS!!! 


Don't you love the pink tulle on the chairs?!?!! So stinking cute!!

Barbie plates and water.


Gotta love friends. So cute!!


These balloons were held down by Barbie! Thanks Barbie :)


Love this!! You can find it at Hobby Lobby!!!


Here they are ALL DOLLED UP!!! L-O-V-E


 Barbie box for a photo-op with the girls. 
My mom made this for the girls to take their picture in it, 


The Birthday Girl!!


Silly girl!!


Such a fun party!!! I'm hoping my sweet girl never forgets her special 6th Birthday party. I know I never will. I found all of my inspiration at these places.


Monday, December 3, 2012

Christmas Mailbox


I love Christmas so much!!! It's such a special and magical time. To add to the magic I made these cute
mailbox's that I found at Paper Princess Studio HERE is the link.


This was so simple to make. I bought most of my supplies at Hobby Lobby. The scrapbook paper, glitter pen, and glitter for Santa's face was bought at my local scrapbooking store.


The chair leg and base was bought at Lowe's.


My favorite part about this mailbox is the fake SNOW!! (Snow Tech) So easy to put on and it really does something special to the mailbox. 


The color of red I used was Santa Red.


I couldn't stop at this mailbox!! I had to make one for my sweet little ones! And can I tell you how much they LOVE their own personal mailbox. They love the fact that they can mail special letter's to Santa whenever they want. So much fun watching their excitement!! 


Here is my sweet girls mailbox!


Here is my little guys mailbox!!


Merry Crafting to all!!

-Heather


Tuesday, November 27, 2012

Barbie Vintage Birthday Party!!


My sweet girl turned 6!! this year. I still can't believe it. WOAH!! I am so excited to share her Vintage Barbie party!!!! Here is a sneak peak of one of the decorations my Mom and I made for her party. During the summer I was in Utah and I took advantage and took a trip over to the Distribution Center and found quite the GEM. This mirror that I turned into this FANTASTIC Barbie picture. My favorite part about this picture is the pearls around the frame and on her neck and ear. So STINKING cute!!
I can't wait to share more from the party.


STAY TUNED FOR MORE!! :)

Saturday, October 20, 2012

EEEEK!!! Bats!!!

How do you like my bats?! I love them so much! It's just the right amount of scary for me. The inspiration came from Country Living  I have so many great ideas on Pinterest. Pinterest is one of my favorite places to find fabulous ideas from talented and creative people.  I love the way it turned out!!!


This was such a easy and inexpensive Halloween decor idea!! If you have a Silhouette machine or a friend it makes it super easy and saves you in having to trace and cut out a bunch of bats. So grateful to have a friend that has one. Maybe one day I will be lucky enough to own my own Silhouette machine.


So what are all of you up to for today? We are watching 13 Nights of Halloween on abc family! The Littlest Vampire as I type this. Such a cute movie and perfect for what I'm posting about. You know "Bats" So fun!!

Have a spooky day!

Wednesday, October 3, 2012

DIY Halloween Apothecary Jars

I have been having so much fun making Halloween crafts this year.


I want Halloween to last forever!! How about you?  I was on Pinterest a couple of days ago and found 
this from a cute blog called Pink Cake Plate I thought they were so dang cute and I knew 

right away I had to make them. She bought her Owls at the Dollar store. I was so very excited and

thought her jars were so dang cute that I hurried over to the Dollar store. When I got there I was SO 

SAD to find out they were all gone!! I was sooo disappointed until I found these Cute pumpkins at Hobby Lobby to replace the Owls that I so badly and I mean so
badly wanted to go on the top of my lids.  They were such a good price too! Only 50 cents for

each pumpkin. I like them so much!! I was practically jumping up and down when I found these

Halloween gems. Also, while I was at Hobby lobby I grabbed the rest of my supplies I needed.

Picked up at Hobby Lobby:
-Black Glitter
-Wodden Candlestick holders. (Bag of 4 for $2.99)
-Wooden bases (Bag of 4 for $2.99)
-E600 glue
Things I already had in my craft stash:
-Sponge Brushes
-Modge Podge
-Black paint
At the Grocery Store:
-Candy Corn
-Reseess Pieces 
-Halloween Marshmallow's 
-2 Pizza jars (Making Pizza for dinner this week!)
-Pasta Sauce jar 

DIY Apothecary Halloween jar was so much fun to make and really easy! I am so BAD at taking 

tutorial pictures. I keep telling myself I will do better at taking pictures. But, I never do. LOL! Maybe 

one day I will do better. So since I didn't take pictures I will tell you how. First thing to do is to wash

your jars after using them. I used Goo Be Gone to get the goo off of the jars from the labels. Works like

a charm. Paint your lids, wooden sticks and bases black. I painted them 2 times. Glue your pumpkins or

whatever you have to your lids. While they're drying, cover your candlesticks and bases with modge

podge and sprinkle them with black glitter. 


After the glitter has dried, glue the candlesticks to the bases. There is going to be lots of waiting so you 

have to be patient. :) Once they have dried glue them to the jars. The next day fill your CUTE 

HALLOWEEN APOTHECARY JARS with your yummy and delicious Halloween Candy.


I LOVE the candy choices!! SO eye catching. Candy is so pretty and so yummy!!!


I love these pumpkins so much!! At one point I considered covering the pumpkins in glitter. So glad I

didn't They look so much better the way they are. 


Tip: Wash your bottles in the dishwasher and then pour some white vinegar in them and let them sit over night. In the morning put them back in the dishwasher for one more wash.

Thanks for stopping by!

Happy Halloween crafting to all of you.

Heather

Friday, September 28, 2012

DIY Glitter Halloween Frame

I am so excited to share this with you!! I was over at Hobby Lobby this week trying to frame this vintage Halloween tin sign and lets just say it didn't work out! It was a unusual size that wouldn't' fit any standard size frame. I was so bummed that I had to make something else just to make myself feel better. Lol! So I decided why not just make a glitter Halloween frame. I LOVE glitter so much!! Anyone else? I'm sure everyone does. Right?! It turned out so dang cute!!  


For supplies, I bought a wooden 8X10 frame from Hobby Lobby and black glitter. I already had on hand some modge podge and a black paint. So to get started your going to want to paint your frame black. I painted mine 2 times. Then I covered it in modge podge and sprinkled the black glitter all over it. Make sure to let the glitter set for about 10 minutes before picking it up. So EASY right? My hubby came home from work and asked me where I had bought this glitter frame from. I was so proud of myself to say that I made it! He was pretty impressed too. It always makes me so very happy when my hubby likes what I make. He is defiantly one of my favorite persons to share my crafting with. 


I thought it would be super cute to put a scrapbooking page in the frame. For the layout I used three different types of scrapbook paper, ric-rac, tulle, and these Halloween embellishments. 

Later on, I plan on putting a Halloween photo of my cute kids from this years costumes. As of now I added a photo of my guy I took a couple of months ago. My little lady is going to be Wedding Cinderella. She looks so cute in it! and my little guy is going to be Spiderman. Muscles and all. Emma is so excited about her costume. She has been wanting to be a bride for years. LOL! She just can't wait to grow up and get married. She asked me yesterday, if I thought anyone would think she was really getting married when she wears her "wedding dress" LOVE that girl!! 5 year olds are the cutest.  


Don't you just love these cute embellishments!! I am in love with them. I bought them at my local scrapbooking store. Love that place!! 


I think the black tulle add's so much cuteness to this frame.


Here it is with a Halloween picture of my little guy in his lion costume!! :)


 This project was so easy to do! I hope you liked it. I LOVE Halloween and all the fun crafting that goes with it. I think I might have a bit of a Halloween crafting addiction. LOL! I can't stop crafting and I don't think that's really a bad thing. It feels so good when you make something cute for your home.

Have a SPOOKY weekend as for me I will be Crafting The Night Away! 


Heather