Saturday, October 8, 2011

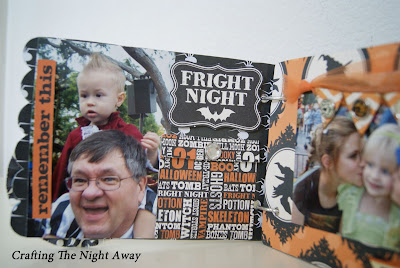
Halloween Mini Album

I LOVE Halloween and Scrapbooking So MUCH!! TWO of my favorite things. I made this fun album during a girls getaway which was so much fun. I loved everyone minute of it. Scrapbooking and eating yummy food for 2 days straight. One of the funnest thing I have ever done. 


These pictures were taken at Disneyland Trick or Treating. Which I highly recommend. It was such a fun night. 


I love this photo of my little man as Captain Hook on his Grandpa's back. My little guy loves his Grandpa so much! 


Don't you just love this one!! I love how cute it turned out. My cute little Tinkerbell and her cousins are her fairy friends. 


This one makes me laugh!! DANGEROUS! He is a little bit of a crazy guy. LOL!


I will always cherish this album and look back and wish they would stay this age forever. 

Wednesday, October 5, 2011

Scrapbook Clipboard


This Halloween Clipboard will be so much fun to put on my scrapbook table. What you'll need to make this is a clipboard, scrapbook paper and embellishments! For EXTRA cuteness of course!!!

Monday, October 3, 2011

Magnetic Halloween Frame


My favorite thing about this frame is the orange chevron paper. I am totally in LOVE with this paper. The other neat thing about this frame is the embellishments and the picture can easily be taken off and  switched with different embellishments and pictures!! SO FUN!! I made one for both of the Grandma's for Halloween. And of course one for me.


Magnetic Halloween Picture Frame

I LOVE the little EMBELLISHMENTS!!


  • The banner removeable!!
  • The embellishments are magnetic!!
  • You can change the way it looks anytime you want. If you make a bunch of EMBELLISHMENTS.


 Materials:
  • Lowe's- 5x8 magnetic sheet.  They were only 67 cents!!
  • Frames- Dollar Store. Super cute frames!! Am I Right?
  • Teresa Collins Scrapbook paper and Embellishments
  • Magnetic Strips-Micheal's Craft Store
  • Modge Podge
  • Sponge Brush


How to:
1. Modge podge the Orange Chevron scrapbook paper onto the magnetic sheet.
2. Cut out your embellishments and cover them with modge podge.
3. Stick on your magnetic strips to the back of your embellishments. Your embellishments will hold your photo onto the frame. :)


All done! Easy as pie. :) Now you have a cute gift to give to the Grandparents for Halloween. 

Thursday, September 29, 2011

Chalkboard Book


I have found a new obsession! Pinterest is more than awesome it's beyond AMAZING. I have found so many neat ideas from Pinterest. One of them is this really neat Chalkboard book that can be made out of an old board book or a board book from the dollar store. I found mine at the Dollar Store. The idea came from here http//:www.whipup.net/2011/09//10/guest-blogger-series-creative-chalkboards/.com


Don't you love the Eraser I made for my little girl? I LOVE it!!


Thank you Regina Lord for the genius idea!! Mine is a little different from her's. The tittle is made out of scrapbook paper and sticker letters. I used modge podge to adhere it. I covered it with a coat of modge podge to give it a glossy look. The other thing I did differently is I made a cute eraser out of modge podge and scrapbook paper. I think the eraser is my favorite part!!  Emma is already so obsessed with her's and she has tried to carry it around with her the entire day. So I would have to say this project has been a success.  

Tuesday, September 27, 2011

Halloween Banner

My Halloween pennant garland was inspired by a cute book called Bethany Lowe's Folk Art Halloween. I love it so much! It has so many cute ideas in it. I would defiantly recommend buying it.

You want to make one of these well I will tell you how! :)

What you will need to make this:

1. Mat board
2. Modge Podge
3. Black card stock
4. Rick Rack
5.Wire
6. Drill
7. Hot glue gun


How To:
1. Cut out a pennant shape onto mat board.
2.Trace the pennant onto scrapbook paper.
3. Modge podge the paper onto the pennant.
4. Modge podge the Halloween images onto the pennant. 
5. You can find the images on Google. 
6.Print them out and trace them onto your black card stock.
7. Hot glue the rick rack onto the pennant. 
8.Drill a hole into the pennants for the wire.
9. Last but not least hang it up! :)


 So cute and I love the VINTAGE feel to it!! :)

Happy Halloween!


Wednesday, April 27, 2011

April Fools Day

While I was visiting my family in Utah, my Mom's daycare and my kids celebrated April Fools Day with a fun  joke. All of the kids loved it so much!! I love the kind of April Fools jokes that are cute and fun!! So when I saw this idea in blog land I had do it!!I wish I could remember where I found it!


Materials:
1. Gummy Worms and Swedish Fish.
2. Small pull the lid fruit cans. $1 a can!
3.Wrapping tissue paper

How to:
1. Empty the fruit from the bottom of the can.
2. Clean out the cans and let them dry. I used a blow dryer to dry the cans.
3. Type up a note that says April Fools!! Love, Mom
4. Put the note in first then the candy, and last of all the tissue paper.
5. Glue on the lid with a glue gun.
So much fun!!!

Tuesday, April 26, 2011

Homemade Easter Buckets


Here are my kids Easter buckets filled up with Easter goodies!! Both of them had SO much fun with them!! It will be fun to let them take their buckets to the beach this Thursday :) I hope all of you had a fabulous Easter!!